
A great Hot Wheels collection deserves more than a storage box. With a well-planned hot wheels 3D print, you can turn loose cars into a clean wall display, a desk feature, or a themed garage scene. Better still, the design can fit your space and grow with your collection.
However, a useful display needs more than a good-looking file. The slots must fit the cars, the base must stay stable, and the material must suit the room. This guide explains each choice in simple terms. It also shows how zone3Dplus can support a one-off prototype or a small batch when you want a professional result.
Why Make a 3D Printed Hot Wheels Display?
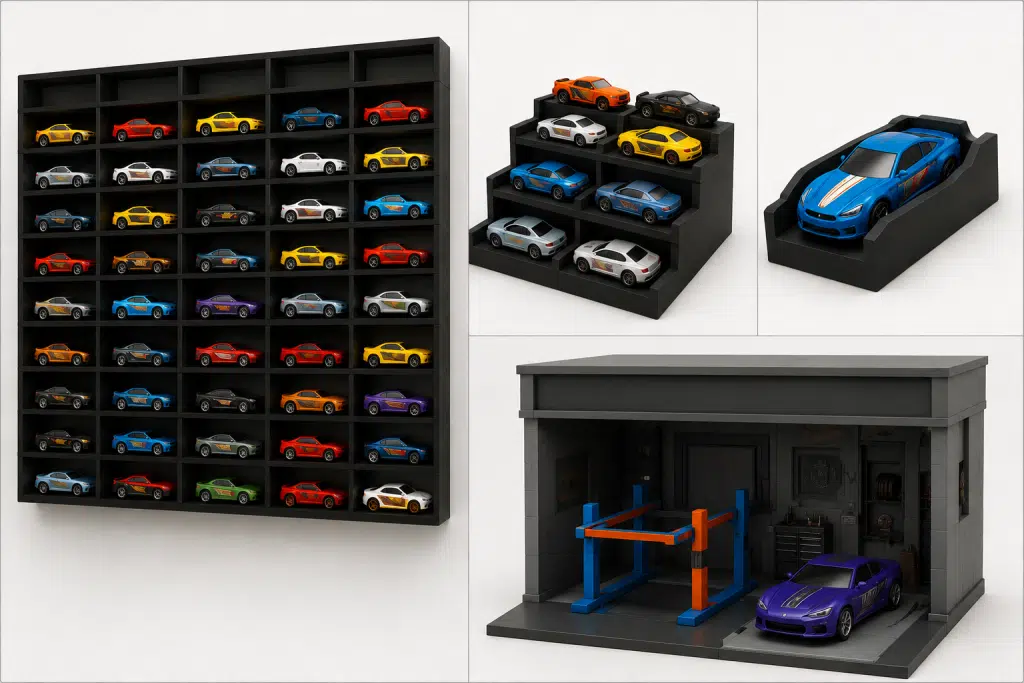
Standard shelves are easy to buy, but they rarely match every collection. Some are too deep. Others waste wall space or hide the cars behind thick frames. In contrast, a 3D printed hot wheels display can be made for the exact number of cars you own.
You can also choose how each model sits. For example, a wall rack can hold cars nose-out to save space. A stepped stand can show each roof and paint finish. Meanwhile, a small garage can create a scene around one special car.
Custom printing offers other useful benefits:
- Add or remove bays to fit the collection.
- Match the stand to 1:64 scale cars.
- Include labels, numbers, or a simple theme.
- Replace one broken part instead of the whole display.
- Print one test unit before ordering more.
Most of all, the project can be both practical and personal. You decide what to show and how to show it.
Choose the Right Display Style
Before you download or draw a model, decide where the display will go. This first choice affects its size, shape, and mounting points.
A wall grid works well for a large set. It keeps the floor and desk clear, while each car gets its own bay. For easier printing and shipping, split a large grid into smaller panels that lock together.
A tiered desk stand is better for a smaller group. Three to five levels often give a clear view without taking up too much space. Add a wide base or small rubber feet so the stand does not tip when you remove a car.
Individual cradles are a good choice for rare or favorite models. Each cradle can use the same base size, so the full shelf still looks neat. In addition, a low front lip can hold the wheels without covering the body.
Finally, a diorama-style garage adds more detail. Ramps, lifts, signs, and tool walls can create a full scene. Yet small details can break, so keep rails and posts thick enough for regular use.
Measure Cars Before You Start the Hot Wheels 3D Print
Many Hot Wheels cars are sold as 1:64 scale models, but their real size and shape can vary. A truck, race car, and fantasy model may not fit the same narrow slot. Therefore, measure the actual cars you want to display.
Use a caliper if possible. Record the longest length, widest body, highest point, and wheel width in your group. Then leave a little space around those measurements. A small gap makes the car easy to place and remove, while still keeping the bay tidy.
Also check the wheel stop. It should touch the tires or sit just in front of them. It should not press against a low bumper or front splitter. If the design uses rails, round their edges to reduce marks on the wheels.
For a modular display, print one bay first. Test your widest and longest cars in it. After that, adjust the file before making the full set. This simple step can save material, time, and cost.
Pick a Material That Matches the Job
Material choice depends on how the display will be used. For a home printer, PLA is a common option because it is easy to print and holds fine detail. Still, it can soften in high heat. As a result, it is not the best choice for a display placed near a sunny window or inside a hot car.
PETG handles heat and bumps better than basic PLA. It is useful for wall clips, hooks, and modular joints. On the other hand, it may produce more visible strings during printing.
Resin can create smooth signs, logos, and small garage details. Yet standard resin can be brittle. Use it for visual parts rather than thin hooks that must flex.
For a stronger professional part, Nylon 12 made with SLS is a practical choice. It works well for clips, brackets, and slim structures because it combines strength with some flexibility. Tough resin is another option when the design needs a firm shape and a smoother surface.
zone3Dplus offers several processes, including SLA, SLS, MJF, SLM, and PolyJet. Therefore, the same display project can use a smooth resin nameplate, a tough nylon frame, or even a metal feature part when needed. Its 3D printing service also supports low-volume work, so a collector can start with one prototype rather than a large order.
Design for Strength, Fit, and Easy Assembly
A clean model should also be easy to make. First, avoid very thin walls on load-bearing parts. Wall hooks and shelf supports need more material than a small sign. Likewise, long flat panels may bend, so ribs on the back can add strength without making the whole part solid.
Next, think about assembly. Large displays are easier to print as sections. Dovetail joints, tabs, or simple screws can join the panels. However, parts rarely come out at their exact digital size. Leave a small gap between mating pieces and test the joint before making a full wall.
Then add safe mounting points. Use proper wall anchors for the wall type, and keep screw heads away from the cars. A hidden keyhole slot can give the display a cleaner face. Even so, always test the loaded rack close to the floor before placing it above a desk or bed.
Finally, avoid copying protected brand art unless you have permission. You can create an original flame, road, race, or garage theme instead. Hot Wheels is a trademark of its owner, and a custom display should not suggest an official product or partnership.
Finish the Display for a Cleaner Look
Post-processing can change a plain print into a display piece. Start by removing supports and smoothing sharp edges. Then fill clear layer lines if you plan to paint the part. A primer helps show low spots and gives the color coat a more even base.
For a garage look, use neutral gray, black, or white on the main frame. Afterward, add one accent color to signs, rails, or bay numbers. This keeps the focus on the cars. A matte finish also reduces glare, while a clear coat makes painted details easier to clean.
If you order a professional print, ask about sanding or sandblasting. zone3Dplus lists these options for parts that need a smoother, paint-ready surface. In addition, its multi-color printing solution can help with signs or display details that need more than one color without separate painting.
What zone3Dplus Client Cases Show About Small Car Projects
zone3Dplus has published client feedback from related model-car and custom-part work. Although these examples are not presented as official Hot Wheels projects, they show what matters when a display needs thin panels, close fits, or quick changes.
Ron C. in Canada ordered SLA parts and reported strong print quality with little warping, even on thin and wide pieces. That point is useful for a flat display panel, where a warped back can make wall mounting hard.
Corey M. in the UK combined printed parts with CNC-made parts. According to the published case, the tolerances allowed the pieces to snap together without extra filing. This type of fit matters for a modular 3D printed hot wheels display with repeat panels or removable labels.
Landon M. in the United States highlighted the price compared with local supply. Meanwhile, Mark H. in Germany used fast design cycles to test several versions. For collectors and small sellers, the lesson is clear: test one unit, check the fit, and then move to the final batch.
These cases support a practical workflow. Start with a measured file. Next, choose the process that fits the job. Then verify one sample before making more.
How to Order a Custom Display from zone3Dplus
The order process starts with a 3D model. zone3Dplus accepts STL, STP, and STEP files through its instant quote system. After upload, you can select the print method, material, finish, color, and quantity.
Before ordering, check these points:
- Confirm that the file uses the correct unit, such as millimeters.
- Check every car bay against your real measurements.
- Mark parts that need to flex, carry weight, or hold a screw.
- Choose a finish that matches your painting plan.
- Order one sample when fit is critical.
Because zone3Dplus states that it has no minimum order quantity, this route suits a single custom stand as well as a short run for a club, shop, or event. Its published RC-car solution also describes dual-stage quality control for finished parts.
Build a Display That Can Grow with Your Collection
The best hot wheels 3d print is not always the most complex one. A simple rack with the right fit, strong mounts, and clean spacing can show the cars better than a large scene with fragile details.
Start with one module and a few cars. Test it in the real space, then change the bay size, angle, or color if needed. Once the design works, add more sections as the collection grows. With careful measurements and the right material, your display can stay neat, useful, and easy to expand for years.
What Files Do You Need for a 3D Printing Quote?
Getting a fast and accurate 3D printing quote starts with one thing: the right file.A good 3D file helps the...
How 3D Printing Helps Reduce Prototype Lead Time
Prototype delays rarely come from one big problem. More often, they come from several small delays stacked together: waiting for...
How to Choose the Right 3D Printing Material for Functional Parts
Choosing the right 3D printing material is one of the most important decisions in any functional part project. A good...